CBE is pleased to be carrying the Alton electric start conversion kits for pre MKIII Commandos. We have been doing so since 2012 and are Alton’s Authorized US Service Center. The units are produced by Alton (www.alton-france.com), based in Brittany France. The company designs, manufactures and exports “Modern Technology for Classic Bikes”, notably generators and electric starters for a wide range of British Classics. Their Norton unit is tidy, well made and straightforward to install. The Alton eStart is available in either POS or NEG ground configurations. View a short installation video by clicking HERE.
With over 450 units shipped worldwide as of 2015, the Alton eStart is proven, robust, and reliable.

Finally, the right electric starter solution for your pre MKIII Commando
Many Norton owners have been looking for the convenience and/or need (older hips, knees and ankles being what they are) of an electric start solution. Given the volume of Nortons going through our shop we, too, had been looking for a solution for our customers. Previously, our recommendation had been “get a MK III”. But, as most of you know, the MK III starting system has its own issues. The Alton system, by comparison, looked almost too good to be true.
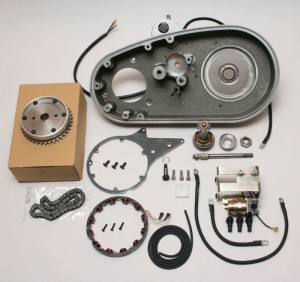
The key to the Alton system is the bolt on/bolt off solution that requires no modification to standard parts. You use their new inner primary casting along with a new alternator. Primary drive, clutch and outer cover are reused. A new center bolt and shims align the inner cover and the clutch basket/drive sprockets are aligned as with any stock Commando. The kit comes with hi amperage cables and a solenoid that mounts with its own bracket on top of your battery. Amazingly, that button on the 71-74 switchgear that doesn’t do anything (red/white) was actually wired for a future starter (that’s the legend). As long as yours is not corroded or skanky (best to clean the contacts anyway), just use as is. That little connection has been waiting for you quietly under the tank all these years….time to plug it in! For our demo installation, we utilized a high amp hour Odyssey battery and our custom battery tie downs (battery recommendations are listed below). A battery tender is always a good idea on electric start bikes. But, otherwise, just plug and play with the parts out their box. The kick starter stays in place and is fully functional, just like a MKIII. Your bike can be returned to stock condition in about the same time it took to install the unit in the first place. So, if you buy another Commando and want to take the starter with you, no problem.
CBE can install the new starter system for you or lend you the necessary tools to install it yourself (mostly a clutch tool and sprocket puller).
Pricing and Shipping in the US
Altons are $2,450 FOB CBE in Essex, VT. We will ship anywhere in the Continental US for a flat rate of $50. We require a $500 deposit upon order, the balance due upon shipment from CBE. As a small business, we love cash and/or checks. A $50 service fee is applied to credit card transactions except for deposits. No sales tax unless you are a Vermont resident.
Warranty
The units are covered under a 2 year warranty. You will receive paperwork with your unit to fill out and submit directly to Alton via scan/email.
Battery Recommendations and CBE hold downs
Alton recommends Interstate battery # FAYTX20HL for use with the Alton installation. We suggest this be your first choice. This battery utilizes conventional Lead-Acid battery technology.
If you are having space issues in the battery area we recommend using an AGM battery, which are typically smaller, sealed, and maintenance free. Because they are sealed they don’t emit harmful gasses during charging, and won’t spill acid all over your bike. They can also be mounted in any orientation. Performance wise, their low internal resistance allows them to provide high currents when requested, making them perfect for starting batteries in vehicles where large bursts of current are required to kickstart an engine.
We have successfully utilized Odyssey PC310 and the MotoBatt MBTX20U AGM batteries.
Of note, AGM batteries seem to not tolerate low charge levels. Be sure to use a battery tender when your bike is not being used, as these bikes seem to have some parasitic leakage which may drain the battery to low levels rather quickly. If this happens, an AGM battery may not recover.
We do not use Li-ion batteries at this point due to the possibility of explosion when they experiencing even minimal damage. It may-or-may-not be an issue when properly installed, but we prefer not to take the chance with our beautiful vintage motorcycles.
The cables in the Alton kit are sized for the Interstate battery, so if you go with the smaller battery you may need to change the wire terminals or use (ugh) washers.
Tech Tips – Things to review before you install your Alton.
We have some tech tips for you before installing your new Alton. First off, we are always happy to talk to you, and hope you will call before you do the install. We work with Alton on maintaining current upgrades and configuration notes as the product improves. We also work with them on tracking field failures, root causes and corrective actions. So, if you do have any issues….please let us know!
- It is most important that your bike be tuned and running properly FIRST. This includes a functional charging system and no backfires. If you bike backfires, you will shear the plugs in the “double gear” meant to protect the starter from same. Easy enough to replace, but does require some disassembly. So, make sure timing and carbs are set up right initially.
- Early Altons did not have timing marks scribed on the rotors. If you have one of those and can’t figure out your timing, give us a shout.
- The three little piss-ant screws that hold the inner cover to the crankcase may, on some crankcase castings, cause interference with the crank cheek if the crankshaft end play is taken up on the drive side. Do a quick fit check with the screws and turn the motor over by hand to ensure clearance. If not, add washers. Be sure to Loctite™ the little buggers.
- The crankshaft seal on the drive side should always be replaced. Cheap as dirt and easy to get at while you in there.
- Probably the most important installation procedure is the air gap between the rotor and stator. Take your time and do it right, even if it takes a couple of tries.
- The next most important is a correctly torqued alternator rotor nut. The spec is 60 foot lbs. That is a big number and a very important one. If your rotor nut comes off you will trash the unit.
- The wiring diagram may show the stock starter button (red/white wire) going to ground when activated. In the US at least, that will create a nicely cooked fuse. The red/white wire is HOT when the button is activated. Wire accordingly to the solenoid.
- ALWAYS talk to us if you are installing a belt drive. We have good experience with Norvils and limited with others. Alton has some spacers they recommend be machined that are listed in the instructions, so best to discuss before you order your kit.
- If you are installing a NEGATIVE ground system, please make sure you ordered a Negative ground Alton. Otherwise, well, warranty may not apply as they say 🙂
- When you are convinced you have it put together properly, leave the spark plugs out, primary cover off and fire it up to ensure there are no clearance issues with the rotor/alternator. If there are, you’ll notice a nice pile of aluminum shavings. STOP!!!! Reset the air gap and try again.
- Take your time, don’t rush the install, and be sure to watch the video!